At SuperATV, we make most of our A-arms and radius arms with adjustable pivot blocks or heim joints. That gives you total control over your machine’s camber, toe, and caster. But why should you care? What’s the point of adjusting your suspension outside of the factory specifications?
Let’s take a look at what camber, toe, and caster really are, how you can adjust them, and why you might want to.
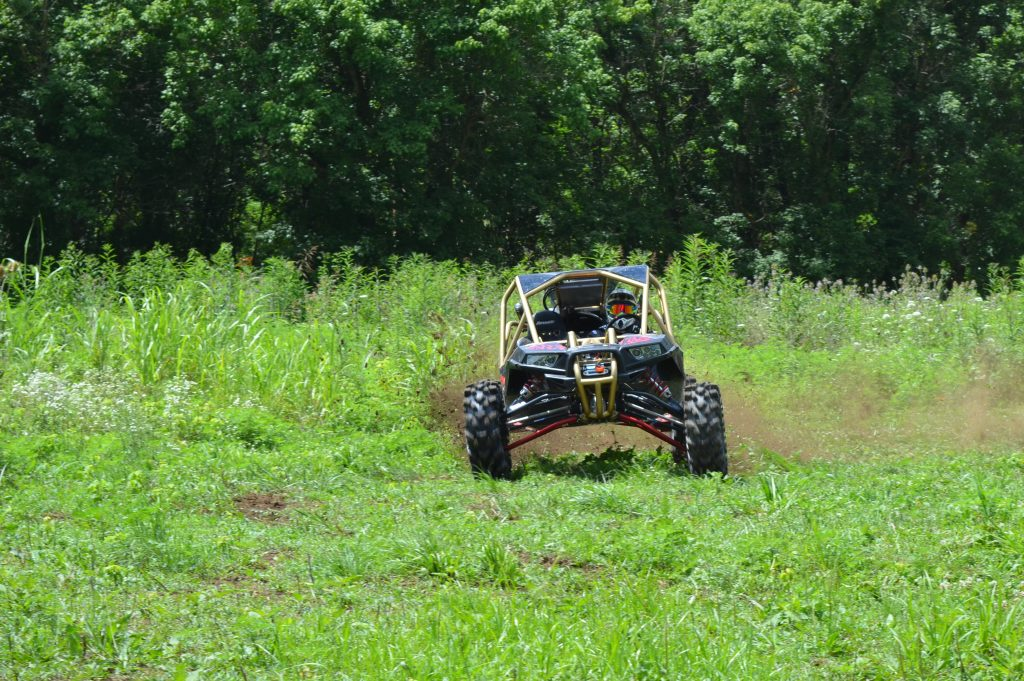
Camber is the inward or outward tilt of the tires when viewed from the front of the machine. Having the wrong camber can really ruin your ride, both in terms of the way driving it feels and in terms of tire wear.
So what’s the difference between crappy camber and the camber you crave? Let’s take a look.

Zero camber is what you might think of as the default camber. It’s a good starting point for a typical rider.
With zero camber, your tires are straight up and down when your machine is sitting on the ground. It gives you good traction most of the time. It’s the camber you want if you’re using a Ranger or similar side-by-side for work, or plan on keeping it relatively slow for most of your rides.
However, once you start getting your speed up on the trails, zero camber starts to hold you back rather than help you.
Negative camber is when the top of your tire leans in toward the center of the vehicle. And having 2 or 3 degrees of negative camber helps immensely with traction on corners.
Here’s why: When you make a fast turn, the bottoms of your outside wheels get pulled in toward the machine. If you have zero camber, that pull causes you to ride on the outside edge of your tire for the duration of the turn, which gives you much less traction.
If you have a couple of degrees of negative camber, the turn pulls your tire so that the bottom is flat against the ground during the turn, which gives you maximum contact with the ground and more traction when you need it most.
For high-performance machines and high-speed racing, negative camber is the way to go.
You can also get negative camber if you add weight to your machine from a cooler, extra rider, or accessories like cab enclosures and reinforced cages. So keep that in mind if negative camber isn’t something you want.
Positive camber means the tops of your tires lean out away from the machine.
You don’t want positive camber. You might like to think of your UTV as a farm tractor’s cousin (some of you put tractor tires on it after all), but all positive camber does is give you less traction and cause your tires to wear unevenly.
You get positive camber naturally when you lift your machine and sometimes when you upgrade shocks. The main thing you should know is that you don’t want it while driving.
The first thing you need is a set of adjustable A-arms and, for some models, radius arms. Your stock A-arms are typically not adjustable. Luckily, adjustable parts aren’t hard to come by. Most SuperATV A-arms and radius arms are adjustable, and so are many other aftermarket suspension parts.
As you make adjustments, keep in mind that the weight of the driver will give you a little bit of negative camber naturally. It’s not always noticeable, but some choose to compensate for it with a smidge more positive camber.

With your machine on the ground and all your tires inflated to the same pressure, grab a carpenter’s T-square and butt it up against the side of your tire. That will tell you quickly whether you have positive (top leaning out), negative (top leaning in), or zero camber. You’ll also be able to tell which way you need to make adjustments. If you use an angle gauge, you’ll know how many degrees you need to go in or out.
This step assumes your lower A-arms are adjustable with adjustable pivot blocks. Some arms have adjustable heim joints instead or adjustable upper A-arms, so keep that in mind as you read.
Lift your machine and remove your lower adjustable A-arms only.
Loosen the jam nuts on your pivot blocks so you can thread them in or out. If you want more negative camber, thread them out. If you need more positive camber, thread them in. If your upper A-arms are adjustable, you’ll need to thread them the opposite way.
Two full turns of the pivot block change your camber by about 1 degree. We recommend about 2 degrees of negative camber if you do high-speed cornering.
Radius arms work similarly. Most stock and aftermarket radius arms have adjustment built in. We recommend adjusting the lowers to set your camber.
Before you go measuring your new camber, put your machine on the ground and roll it back and forth. This settles the suspension and shows you what your true riding camber will be.
Repeat these steps until you have your desired camber, then take it out for a spin!
Keep your machine on the lift and make adjustments and measurements while it’s still in the air. Just keep in mind that with the suspension at full drop, you’ll have roughly 2 degrees more positive camber than you’ll have on the ground.
Keeping it lifted allows you to install your lower A-arms with just bolts to rapidly adjust and check easily. The only downside is that you still won’t know if you got it exactly the way you wanted until you put the machine back on the ground. Always double-check your camber after you put the machine on the ground and settle the suspension.
If you imagine an invisible line connecting the ball joints on your hub, that’s your steering axis. The tilt of your steering axis when viewed from the side is your caster. Good caster gives you great control. Bad caster can either make your steering rack feel like it’s filled with rocks or make it feel so squirrely that it’s difficult to stay in control.
Normally you don’t need to mess with caster, but if you get bigger tires, or just enjoy fine-tuning every aspect of your machine, you’ll want to take a look at it.
A big culprit behind bad caster is bigger tires, and here’s why.
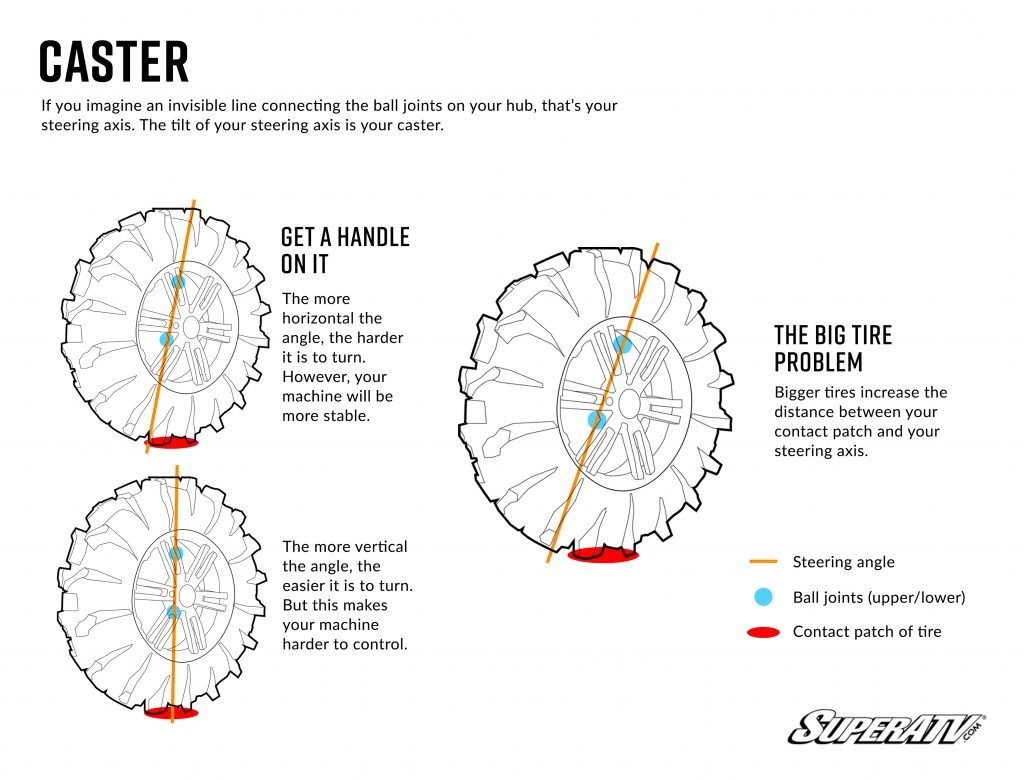
The upper and lower ball joints on your vehicle are never straight up and down. The upper is always a few inches behind the lower. This is super important because it means that when you turn, your pivot point is slightly ahead of your tire’s contact patch (the part of the tire that actually touches the ground).
That makes the ground pull your tire backwards and your wheels tilt over when you turn. That’s what causes your tires to straighten out when you let go of the steering wheel.
The angle between your steering axis and your contact patch dictates the way your vehicle handles more than anything else. If your steering axis is flatter, your wheels will be harder to turn, but you’ll have more steering stability. If the steering axis is more vertical, it’ll be easier to turn, but it will require more work from the driver to keep the wheels pointed where you want them. Larger tires can throw the steering axis angle out of whack.
Bigger tires increase the distance between your contact patch and your steering axis, which makes your wheels harder to turn. So when you upgraded your machine to some monster 40-inch tires, maybe it wasn’t just the weight that made them harder to turn, but your caster.
If you’re completely realigning everything on your machine, you should complete your camber and caster adjustments before you adjust your toe.
Make sure your tires are both inflated to the same psi, then measure your caster using a caster gauge and compare that to the specs given in your owner’s manual. If your caster needs adjusting, the next step is to lift your machine.
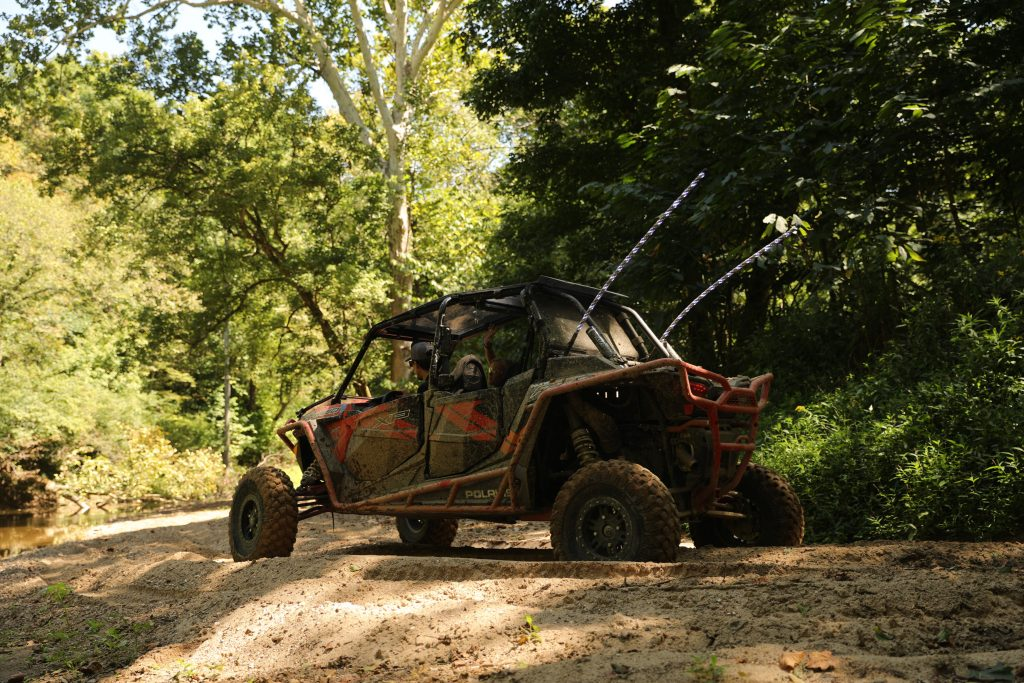
You have to remove your adjustable A-arms in order to make adjustments. SuperATV usually puts the adjustable pivot blocks on the lower arms, but adjustable heims are often located on the upper A-arms. Other brands may have their adjustment located elsewhere.
Thread the front or rear pivot block in or out 1 or 2 turns. Threading the front pivot block in, or the rear pivot block out, will make your steering axis flatter and give you more stability. Doing the opposite will make your steering axis more straight up and down, which will make steering easier. A few degrees can make a huge difference, so start with small changes. Make sure both sides have identical caster.
Reinstall your lower A-arms and roll the machine back and forth to settle your suspension. Then use your caster gauge to remeasure your caster.
If your caster measures within the official specs, take it for a test drive! Drive it slow and see how the steering feels. You can tweak it from there if you want.
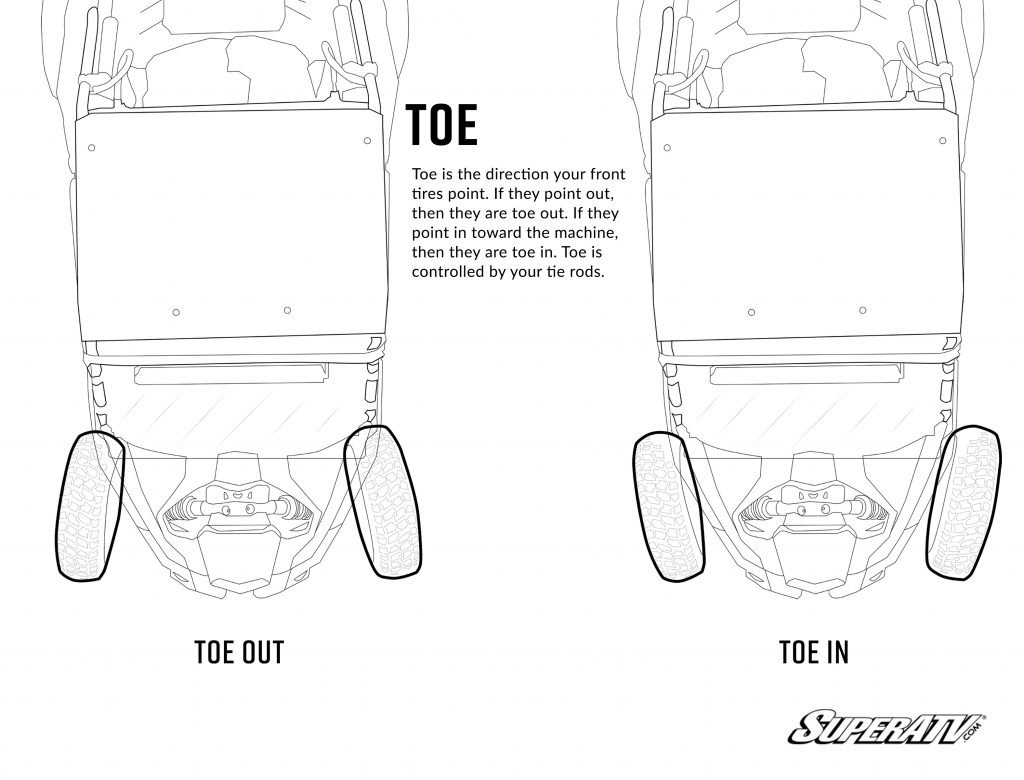
Toe is the direction your front tires point. If they point out, then they are toe-out. If they point in toward the machine, then they are toe-in. Toe is controlled by your tie rods.
Too much toe-in or out can cause major wear on your parts, as well as make handling more difficult. That could lead to tie rod end failure, wheel bearing failure, and other issues.
Every side-by-side has different requirements for toe. Usually, they’ll come with a small amount of toe-out from the factory. There’s usually not a good reason to stray from the factory settings, but if you change suspension parts or haven’t checked your toe in a long time, your alignment might be off.
You generally want to adjust toe after you’ve done your camber and caster adjustments. So make sure you’re done with those first!
Make sure your tires are both inflated to the same psi, then park your front tires on a slick surface to make adjusting easier. You could use cardboard, a plastic sheet, or something similar. You’ll need a helper or a tool to hold the steering wheel straight at this point.
Loosen the jam nuts on your tie rod and turn it by hand or with a wrench if needed to thread or unthread both tie rod ends simultaneously. If you look down the side of your tire as you turn, you can line up the edge of your front wheels with your rear wheels to get them pointed straight forward.
With the steering wheel held straight ahead, mark a point on the tread centerline of each front tire. Position both marks at the front of the tires, at axle height. Measure straight across between the marks and record the distance.
Roll the machine straight forward until those same marks reach the back of the tires, at the same height. Measure between them again.
Compare your front-of-tire measurement with your rear-of-tire measurement.
The difference between the measurements is your total toe across both front wheels. For example, a front measurement of 60⅛ inches and a rear measurement of 60 inches means you have ⅛ inch of total toe-out. Compare that result with the factory specifications for your vehicle or suspension kit.
If your toe doesn’t match the factory or suspension spec documentation, loosen the jam nuts at both ends of the tie rod. Rotate the tie rod to lengthen or shorten it. Make small adjustments and keep the steering wheel centered.
After each adjustment, roll the machine to settle the suspension and repeat your measurements. Once alignment is correct, you’re still not quite done. Measure the front tire marks to the centerline of your machine. The measurement should be the same on both sides. If it’s not, you’ll need to adjust both sides the same amount until it is the same on both sides. Once your toe is correct and both tires are the same distance from the centerline, it’s time to tighten everything up. Hold the tie rod ends in place and tighten the jam nuts to specification.
Getting everything adjusted just right gives you a smoother ride, better control, and longer-lasting components. So don’t skip it! Keep an eye on changes to your alignment so you can proactively maintain your machine. And if your alignment is off, make sure your ball joints, tie rod ends, or other suspension components aren’t worn out.
The point: keep everything in good shape, and you’ll have a good ride!
Don’t forget: if you don’t already have adjustable A-arms, it’s time to check out all of SuperATV’s Adjustable A-arms!
Disclaimer: This article was written by an employee of SuperATV. The views, opinions, and recommendations expressed in this blog are the writer’s own and do not necessarily reflect those of SuperATV. This content is provided for informational purposes only and is not intended as safety advice or official technical guidance. Modifying vehicles and using aftermarket parts can impact performance and safety. Readers are responsible for ensuring proper installation, compatibility, and safe operation. SuperATV makes no representations or warranties regarding the accuracy or completeness of this information and assumes no liability for any actions taken based on it.



33 Comments
I did all that and when I’m ridding my 800 rzr when I throttle up the front end of the bike rides up and the front wheels turn in what do I need to do
Hey Jason, what you’re saying sounds normal. They’re going to change a little bit as your suspension flexes. Thanks for the support!
Hello-
Good stuff! However- it seems the information provided on Camber in the illustration contradicts the information provided in the narrative right below it.
The illustration info says: “Zero camber or some positive camber can both be useful depending on your riding style. Avoid negative camber as all it’s good for is wearing out your tires, wheel bearings, and other parts.”
The narrative in the paragraph that follows goes on to say:
“Positive Camber-
Positive camber means the top of your tires are leaning out away from the machine.
You don’t want positive camber. You might like to think of your UTV as a farm tractor’s cousin (some of you put tractor tires on it after all), but all positive camber does is give you less traction and causes your tires to wear unevenly.
You get positive camber naturally when you lift your machine and sometimes when you upgrade shocks. The main thing you should know is that you don’t want it.”
So, the illustration says I don’t want negative camber, the narrative says I don’t want positive camber. Which is it?
Hey Dennis, that was an error on our end. Thank you for letting us know! You do not want positive camber. The illustration has been corrected. Thanks for tuning in!
deniis u might want to read the illustration again it doesn’t say some positive camber it says some negative and avoid positive like the narrative
This RZR has great camber. The tires are straight up and down even when it’s loaded with passengers. If this side-by-side was tuned for high speed cornering, it’d need a little more positive camber.
Photo by SuperATV
Am I misunderstanding? Shouldn’t this say “If this side-by-side was tuned for high speed cornering, it would need a little more NEGATIVE camber?
Hey KB, thanks for the feedback. You are correct—that’s a typo. Thanks for helping us out!
I have a 1991 Chevy 1-ton van I had to change a tie rod on the ball joint almost fell out but I caught it in time because I heard Some Noise up front. I tried to count the threads on the new one but I am definitely getting toe in I never had to ever adjust front end on anyting I am very mechanically inclined that I want to thank you for the information about adjusting in and out.
We’re glad we could help, Lee!
How do I get the adjustable parts. My email is jameshaw558@gmail.com
Hey Jim, thanks for reading! Give us a call at 855-743-3427 and we should be able to get you what you’re after.
What are the stock specs on Camber, Caster and Toe for a RZR TURBO S4?
Caster. You say the upper ball joint is a few inches behind the lower or is the upper a few inches behind the point of contact in the diagram? Trying to set mine up now with portals and big tires. One side is way off from the other side.
Hey Roger, thanks for checking in with us! The upper is a few inches behind the lower. If you imagine the invisible line that connects your ball joints extending on past them, it should hit the ground in front of the contact patch. Hopefully this is helpful. Feel free to reach out to us at 855-743-3427 for any additional questions.
Is adjusting the camber on the rear the same process as the front? And should they be set the same as front at 1 or 2 degrees?
Hey Kelly, thanks for reaching out. Most stock and aftermarket radius arms have adjustability built in. We recommend adjusting the lowers to set your camber. This is how you adjust the rears on most vehicles. It’s the same process for the front, and you want to shoot for the same camber: 1 or 2 degrees. Give us a call if you need more help at 855-743-3427!
Hello,
I have your high clearance upper AND lower a-arms on my 2021 X3 Max. The only adjustability for camber is in the upper arms. What’s the best way to make camber adjustments with the upper arms?
Hey Trevor! Sorry for the confusion. You only have to remove your upper A-arms in this case. Just loosen the jam nuts on your pivot blocks so you can thread them in or out. If you want more negative camber, thread them in. If you need more positive camber, thread them out. Everything else is the same whether you have adjustable pivot blocks on your upper or lower A-arms. Hopefully this helps! We appreciate you checking in. Thanks for the support!
Can you adjust tie rods on Honda Pioneer 1000-5 tow out?
Hey Robert! If you’re referring to OEM tie rods, I’m assuming you’ll have some adjustment but not sure exactly how much. If you’re referring to SATV tie rods, they are adjustable. Thanks for checking in with us!
Why when I back up my XP1000 it pulls toe in really bad, when you drive forward it goes back to where it should be. The entire front end has been rebuilt. Might it be in the steering gear?
My Rzr has welded cups, so the front end is always locked together along with portals making it really hard to steer unless I fill the tires with a decent amount of air…. The caster is only off by a hair (best I can tell right now sticking a mini level against the portal plate. But would moving the arms just a thread or 2 make much difference? One lower is slightly forward and one is slightly to the rear but not enough to be noticeable to the eye.
Hey Drew,
Adjusting them wouldn’t mess with your steering very much. Do you have steering stops installed? You can remove them to give you better steering! Give us a call if you need further assistance. 812.574.7777
Great build quality with the control arms. They fit well and align well with the stock mounting locations (frame, shocks, etc)
The instructions are misleading. The package the arms came in states that they are pre-adjusted. The instructions very clearly tell you to adjust the length of the lower arms to ensure the camber is correct.
I spent the time to get the distance between center of ball joint and center of bushings as close to the prescribed length as possible. I ended up with some very significant negative camber (3 deg or more?) if you do this as the directions call for you will need to remove the arms again to adjust them shorter so that the front camber is reasonable. This should be revised in the instructions if the listed lengths are not correct.
Hey Brian,
We’re sorry to hear about your negative experience! This isn’t a common problem, but we will forward your feedback.
I ordered a set of highlights lower a-arms for my 700-4 pioneer. Your article says that all super atv arms are adjustable, This is not true the 700-4 pioneer is not. And apparently no one makes them either. This is from your article. . Luckily, adjustable parts aren’t hard to come by. All SuperATV A-arms and radius arms are adjustable and so are many other aftermarket suspension parts.
Hello Clifford,
We apologize for any confusion this may have caused! We’re happy to hear you were able to find a solution.
Can someone tell me why the middle of my tire is wearing in the middle which one is causing that
Hey Jor,
If the tire is wearing in the middle, it usually means it’s overinflated. Too much air pushes the center of the tire against the road more than the edges.
I have a 2026 can am commander xt and it has a bad shimmy it shake in the steering wheel. What could make this or what can I do to correct it. Thank you
Hey Kenny,
A steering shimmy on your 2026 Can-Am Commander XT is usually caused by tire balance, mud packed in the wheels, bad alignment, or loose steering components. Start by checking tire pressure and cleaning the inside of the rims. Then inspect the tie rods, ball joints, and wheel bearings for play. If it only happens at certain speeds, it’s most likely tire or wheel related.
I have a 2017 Yamaha Wolverine 700 that has always had, what I feel, is way too much negative camber. I’ve put on 2 sets of front tires to one rear set. Toe was the first thing I checked and it was very slightly toed out, I set it to 0 to see if that would help the wear but it made no difference. I’ve been looking at the a-arms superatv sells to be able to adjust camber more towards neutral. Can someone answer how many degrees they can be adjusted from where they are set from the factory?
Hey Karl,
We have technicians available to speak to. Just give us a call! 812.574.7777