Looking to make your ride safer? Installing a turn signal kit on your ATV or UTV is a smart upgrade that improves visibility and makes it easier to communicate with other riders on the trail.
In this guide, we’ll walk you through how to install turn signals on a UTV or ATV using a universal turn signal kit, like the one from SuperATV.
Whether you ride a Polaris, Can-Am, Honda, Yamaha, or another brand, this guide covers the essentials of turn signal installation using our universal kit.
A turn signal kit helps you communicate with other riders on the trail. Image by SuperATV.
Why Adding Turn Signals to Your ATV or UTV Matters
Here’s why you should consider installing a turn-signal kit to your ATV or UTV:
Improved Safety: Clearly signal your intentions to other riders.
Better Communication: When riding in groups or on shared trails, turn signals help riders know when you’re about to make a change in direction.
Pro Tip: SuperATV’s Universal Turn Signal Kit includes a preassembled, color-coded wiring harness to simplify installation. Pair your turn signals with side and rearview mirrors to help keep track of the riders around you too.
This guide uses SuperATV’s Universal Turn Signal Kit and is demonstrated on a Polaris Ranger 570. The steps are similar for most side-by-sides and ATVs. Follow the instructions supplied with your kit for wiring connections, hole sizes, and mounting requirements
1. Preparing Your ATV or UTV for Installation
Your UTV’s battery and wiring locations may be different than ours. Image by SuperATV.
Remove the hood, dash panels, or seats to access wiring areas.
Use a test light to find an accessory power source (a wire that’s only hot when the key is on).
Disconnect the battery to avoid shorts during installation.
Tidy up loose parts and secure any panels to prevent wire strain.
2. Installing the Front Turn Signal Lights
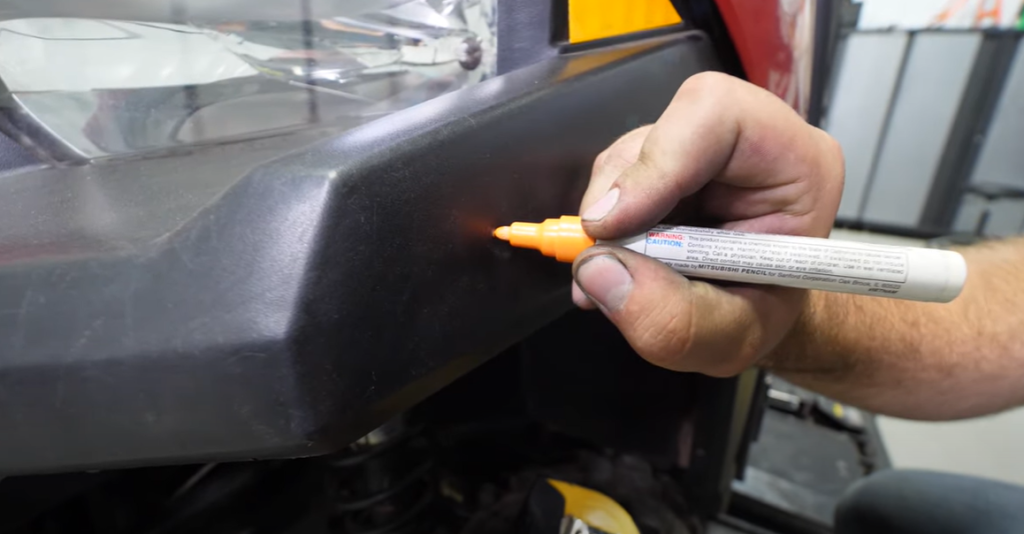
Paint markers are a great way to mark plastic—the brighter the color, the better. Photo by SuperATV.
Measure and mark symmetrical points on the front fenders or grille area.
Check behind each mounting location for wiring, hoses, and other components before drilling
Drill holes using a step bit, install grommets, and insert the LED lights.
Ensure lights are aligned for a clean, OEM-style look.
3. Routing and Securing the Wiring Harness
Don’t secure your wiring to any parts that may get hot! It’ll melt the wires, and you’ll be mad. Photo by SuperATV.
Route the harness from front to rear along the frame rails, avoiding hot or moving parts.
Use zip ties or clamps every few inches for security.
Check labels on each wire—most harnesses are pre-labeled for easy ID.
4. Mounting the Rear Turn Signal Lights
Step bits are extremely convenient for this kind of work. Photo by SuperATV.
Position rear lights near existing tail lights for symmetry and visibility.
Check behind each mounting location for wiring, hoses, and other components before drilling
Drill and insert grommets, then mount the LEDs.
5. Connecting Power, Ground, and Switch Wiring
Make sure to label your wiring so you know what wires go to what accessories. This makes it easier to add more upgrades in the future. Photo by SuperATV.
Connect power and ground at the locations specified in your kit’s instructions and your vehicle’s documentation.
Route the switch wiring to your dash, and install the turn signal stalk or toggle switch.
6. Adding the Horn and Indicator Light
Our Ranger’s dash has open panels to mount the horn rocker switch. If yours doesn’t, consult your kit’s instructions to find an appropriate spot. Photo by SuperATV.
Mount the horn in a solid location, ideally facing downward to avoid water collection.
Wire the horn to the harness following the included diagram.
Mount the indicator light on your dash so you know when your turn signals are on.
7. Installing the Flasher Relay and Testing the System
Remember to secure plugs facing down whenever possible to help prevent them from collecting water. Photo by SuperATV.
Secure the flasher relay with the plug facing down to shed water.
Reconnect the battery and test the system:
Left turn
Right turn
Hazard lights
Horn
If any signal doesn’t work, check your grounds and wire connections.
8. Securing Wiring and Finishing Touches
Measure twice and cut once and you’ll end up with an OEM-style finish. Photo by SuperATV.
Tidy all wiring using protective sleeves or additional clamps.
Avoid areas with heat, sharp edges, or moving suspension parts.
Replace all body panels and ensure wires are not pinched.
Put Your New Turn Signals to Work
The amber lights look good and are highly visible at night. Photo by SuperATV.
Now that you’ve successfully installed your ATV or UTV turn signal kit, you’re ready to hit the trail with better safety and visibility. Turn signals are a must-have upgrade to help other riders see your next move.